A Guide To Fujifilm Shutter Speed Priority
In this blog I will share a simple and effective system for shutter speed priority exposure photography with your Fujifilm camera. This blog will be centred around the Fuji XT5 however everything carries over to the XH2, XS-20, X100, X-Pro and more. Furthermore the theory I share applies to all cameras and digital photography in general. Finally, please keep in mind that this is simply the method that works for me and how I shoot. It may or may not work for you, so feel free to adopt what suits you and disregard the rest.

Why Shutter Speed Priority?
NIGHT PHOTOGRAPHY: When shooting at night, the aperture is usually wide open, and the ISO is already pushed towards the higher end of the scale. In most cases, the shutter speed needs to be reduced to allow more light in, and the difference between 1/100 and 1/60 can determine whether you get motion blur or a sharp image. By shooting in shutter speed priority, I control the parameter that has the biggest impact on the image. For one type of shot, I might be able to go a little slower and reduce the shutter speed, which in turn lowers the ISO. For another shot, I might need a higher shutter speed and be willing to accept the higher ISO. When shutter speed is critical, I prefer to be in control—not the camera.

1/170
CREATIVE MOTION BLUR: Anytime I want to introduce creative motion blur, shutter speed is the only setting that can achieve this effect. I’ll get into specific shutter speeds later in this blog.

1/10
FAST SUBJECTS: When shooting fast-moving subjects, shutter speed is crucial either to freeze the motion, such as capturing a bird in flight, or to exaggerate speed, for instance, in a panning shot of a moving car or a person walking.

1/5400
Downsides of Shutter Speed Priority
The biggest downside is that aperture control is taken out of your hands, which can negatively affect your composition and the overall quality of the photo. Additionally, once you go beyond 1/500, unless you’re shooting sports or wildlife with a long lens, the photo will look the same whether the shutter speed is 1/1000 or 1/4000. At that point, you’re better off switching to aperture priority.
Auto ISO
Auto ISO allows you to set the minimum and maximum ISO. This ensures the camera operates within a defined set of parameters. For example, you might set ISO between 100 and 6400. Auto ISO also allows you to set minimum shutter speed values. For the purpose of shutter priority, we will ignore them. This is covered in more detail in the Aperture Priority Blog. Fujifilm cameras offer three different Auto ISO settings, which I set up as follows:
AUTO ISO 1:
I use this for daytime photography or when there is plenty of light.
Minimum ISO: 125
Maximum ISO: 6400
AUTO ISO 2:
This is for shooting at night or in low light.
Minimum ISO: 500
Maximum ISO: 6400
AUTO ISO 3:
I use this whenever I want to maintain a high shutter speed.
Minimum ISO: 1000
Maximum ISO: 12800

Shutter
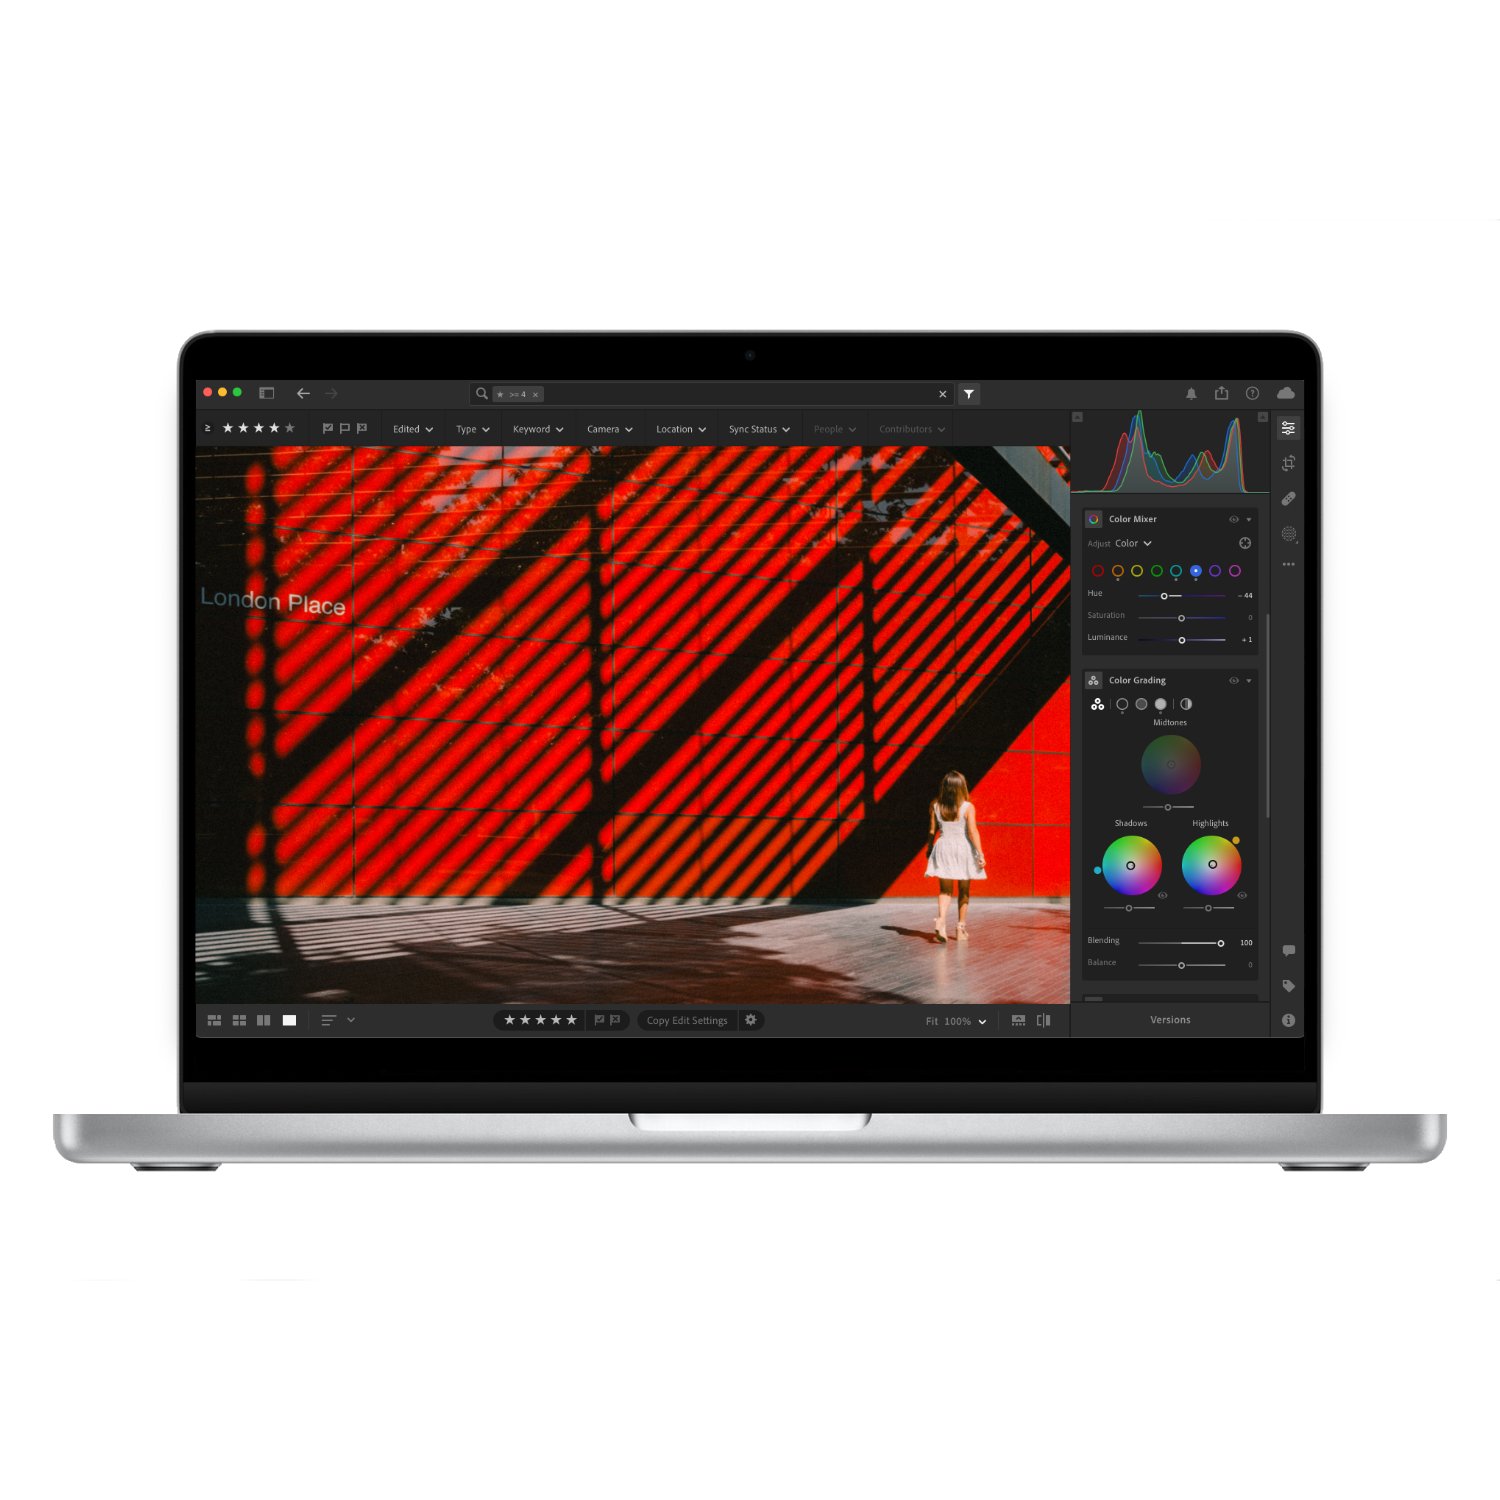
Once Auto ISO is set, the next step is selecting the desired shutter speed. This is a tricky topic because it depends so much on the subject, whether your camera has IBIS, how steady are your hands, focal length and the desired result. To keep things simple I will suggest different shutter speeds based on how I shoot and show examples. This isn’t gospel so you will need to do trial and error with your own camera. For these examples I will a common focal length of 35mm (50mm on a full frame camera). This focal length is perfect for street, travel and portraiture. Finally this is assuming handheld photography with IBIS or OIS.
1/1000 - 1/8000: Everything is frozen. I only use in harsh light or extreme cases with substantial movement.
1/500: Most things are frozen and this is a safe shutter speed for 99% of scenarios.
1/200: The minimum for general daytime photography.
1/100: You need to slow down but easy to get a sharp photo however some moving subjects will show motion blur.
1/60: I use this for creative shots but on a camera with good IBIS and some tactics for. stabilising the camera (using viewfinder, holding your breath etc) you can get sharp results. However pretty much anything moving through your frame will have some motion blur.
1/30 - 1/5: I use this exclusively for creating shots with motion blur.
1/5 and below: This will require a tripod.

1/200

1/30

1/120

1/60
Exposure Values
I generally try to keep the exposure around 0, but I’m comfortable adjusting by ±1 stop when shooting in RAW. Here are some guidelines I follow:
Extreme light (summer, midday, open area): 0 to +0.3
Normal light (typical sunny day with some shade): 0 to +0.3
Changing light (sunny street to dark market): 0 to +0.3
Overcast light (typical cloudy day): +0.3 to +0.6
Low light (blue hour): -0.3 to -1
Night: -0.6 to -1.6
That said, I always let the scene dictate the exposure rather than relying solely on the camera. Sometimes overexposure works best, while in other cases, exposing for the highlights produces better results.

Metering Modes
When shooting in manual mode, you control the metering since you decide what to expose for. In shutter priority, however, you need to tell the camera what it should expose for. Selecting the right metering mode for your situation and desired outcome will lead to better results straight out of the camera.
MULTI: This is my go-to mode for most photography. It’s an intelligent mode that evaluates the entire scene and adjusts exposure accordingly. It works well for most scenarios but may struggle in high-contrast environments or when you need to expose for a specific subject.

CENTRE: This mode is useful when you need to expose for whatever is in the middle of the scene and disregard the edges. For example, shooting through a window or a gap, or any situation where the only exposure that matters is in the centre.

SPOT: A very creative option, this works best with single-point autofocus. It has a significant impact on exposure and is ideal if you want to expose for specific highlights or a particular part of the scene.

AVERAGE: I personally don’t use this mode. It calculates the average exposure for the entire scene. While it may be helpful in some specific cases, I have yet to find one.
Auto Exposure Lock (AEL)
The final and most powerful aspect of shutter priority is Auto Exposure Lock (AEL). Pressing this button locks the exposure settings as they are, allowing you to expose for one part of the scene, lock it, and then recompose. This gives you a great deal of creative freedom, and I often use this feature to achieve the desired exposure for one part of the scene before composing a different shot altogether. This also allows you to fully focus on any camera movements when shooting in shutter priority mode.