Just Got a Fujifilm? Do This First
If you’ve recently treated yourself to a new Fujifilm camera, or perhaps were lucky enough to receive one as a gift, this blog is for you. As someone who’s been a Fuji user for over six years, I’ll give you a quick crash course on how to get started with your camera.

Button & Dial Setup
If you press and hold the Disp Back button, you’ll access the menu to set up your custom buttons. I can’t give you an exact setup, as I don’t know which camera you have or your approach to photography. What I will say is that you want to ensure as much of the camera’s operation as possible can be managed through the buttons, reducing the need to go into the menus, whether the main menu or the quick menu. The more time you spend fiddling with menus, the more shots you’ll miss.

Q Menu
Anything you couldn’t assign to a physical button can be set up in the Q menu. You have options to add 4, 8, or even 16 items, but less is more—only add what’s critical, not everything under the sun. The purpose of the quick menu is to enable you to access and change settings swiftly on the go.

JPEGs, RAW & Editing
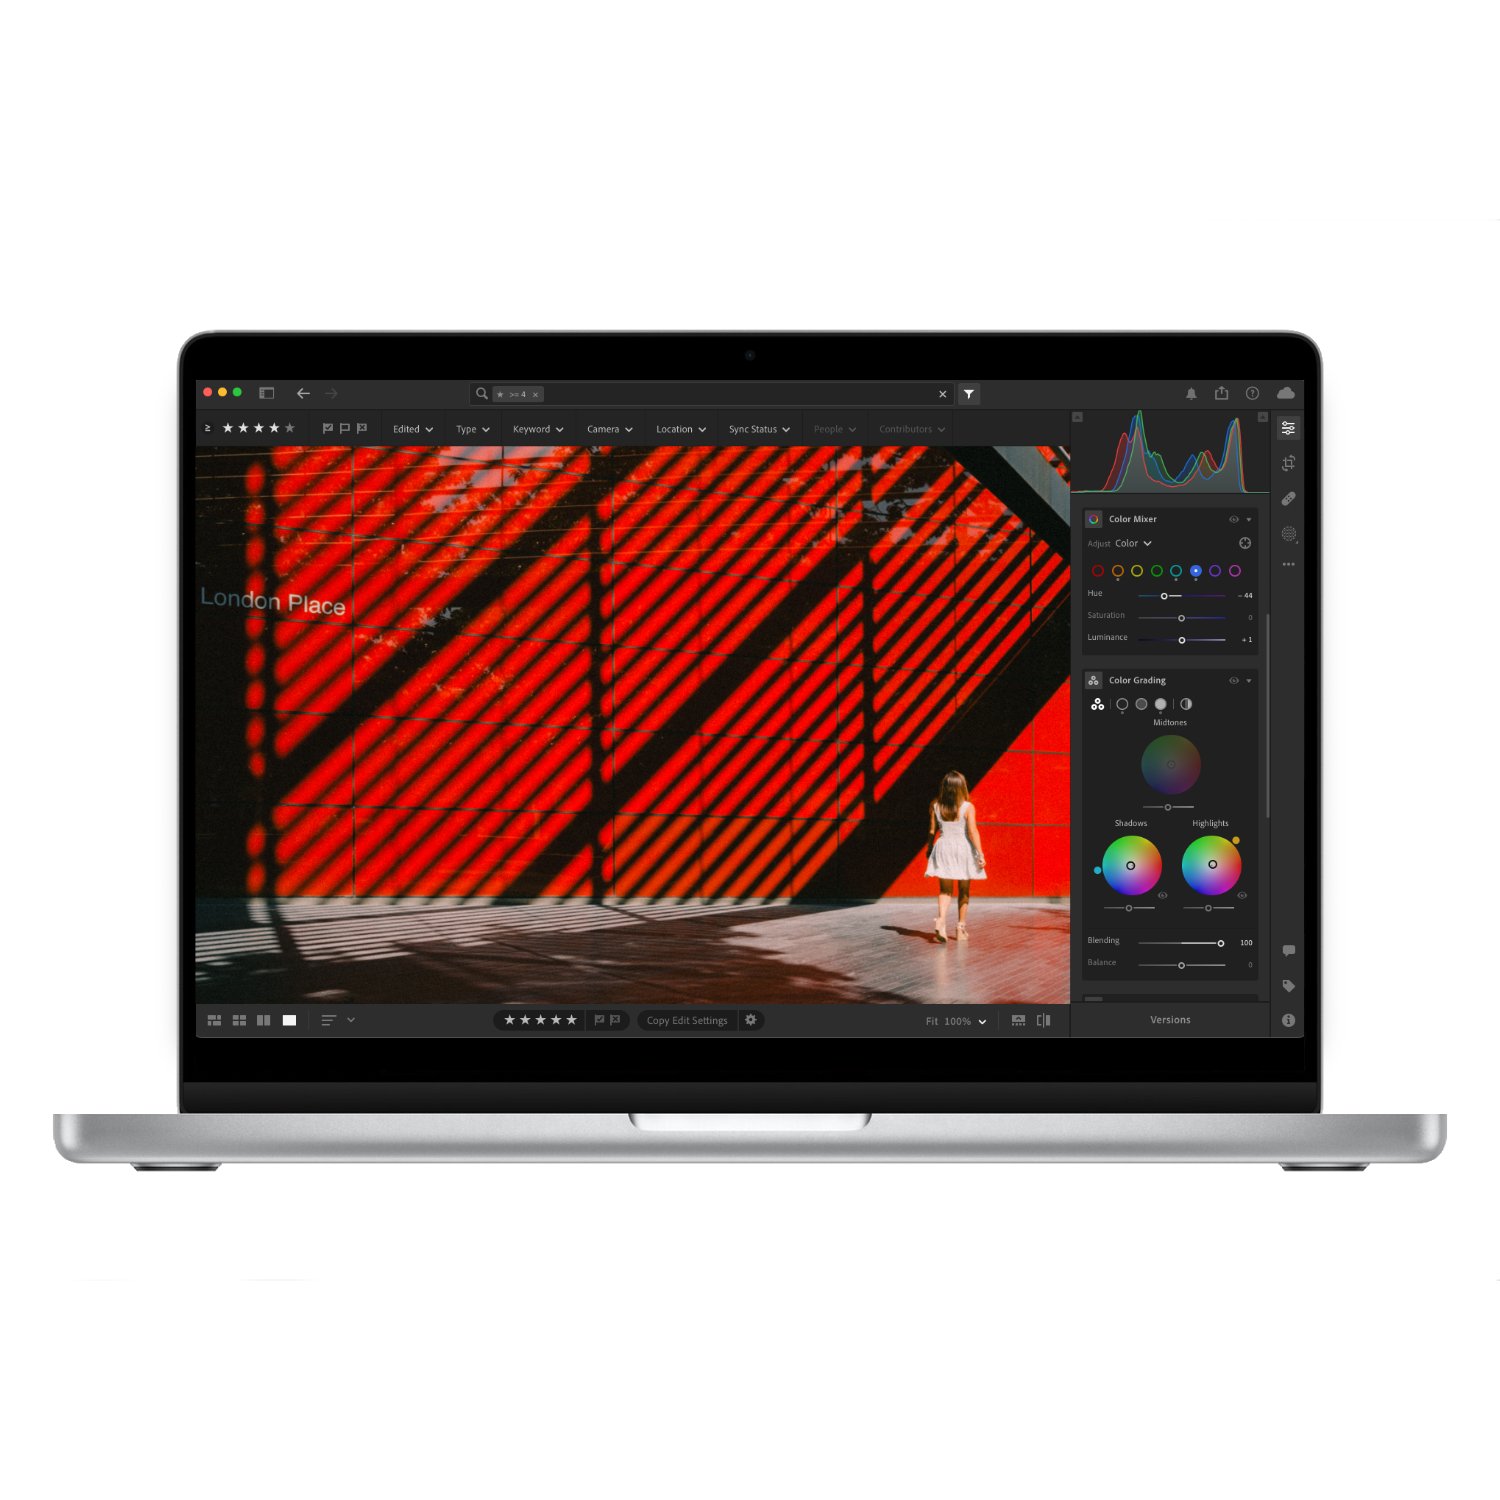
One of the biggest selling points of Fuji cameras is their JPEG files, particularly the customisable settings and adjustments that allow you to create your own unique look. In addition to film simulations, you have control over curves, clarity, grain, and much more. This can be overwhelming, so let me first share a basic simulation to get you started, along with a blog you can read here that provide more simulations to try. Unless you’re committed to shooting either RAW or JPEG exclusively, I suggest setting the camera to FINE+RAW.
Film Simulation Nostalgic Neg
Monochromatic Colour N/A
Grain Effect Weak Large
Colour Chrome Effect Weak
Colour Chrome FX Blue Weak
Smooth Skin Effect Off
White Balance Auto (R0, B0) - Please note that any white balance shift you do will also impact the RAW file.
Dynamic Range DR400
D Range Priority Off
Tone Curve H-2 S+2
Colour +3
Sharpness -3
High ISO NR 0
Long Exposure NR Off
Colour Space sRGB
Clarity 0 - note that clarity only works in single shot mode (not burst) and there is a delay after taking a photo when enabled.

If, like me, you prefer to edit RAW files, you’ll have two main choices: Capture One or Lightroom. Although many people rave about Capture One, the best software is the one you’re already familiar with and invested in. Not sure which to choose? The answer is simple—Lightroom. There will be a more detailed blog on this soon, but in a nutshell, Lightroom is easier to learn, use, and achieve good results with. Capture One is more advanced, has a steeper learning curve, and offers more control.
Any decent photo editor will allow you to set profiles. In Lightroom, this option is near the top, enabling you to assign a profile to the photo. When you open a Fuji RAW file in Lightroom or Capture One, you can change the profile to one of the film simulations you’d have seen in the JPEG settings. You can then use that profile as a preset to begin your edit.

General Settings
There are some key settings I adjust straight away. First, I turn off all sounds—you don’t want your camera making unexpected noises.

Next, I declutter the screen by turning off anything I don’t need or care about.

Lastly, I set Auto Power Off to 5 minutes, enable Boost mode for Performance, and set the Auto Power Off Temp to High.

Camera Guides
If you’re finding this blog helpful, please check out my full camera guides for Fuji cameras here.
Shooting Modes
Your Fuji will have several shooting modes. The way you enable them will depend on your camera model. On a camera like the X-H2, they’re already on the dial. On models like the X-T or X100, you’ll need to switch the relevant dials to auto.
Aperture Priority: You control the aperture, and the camera handles the rest. This is my go-to mode for 90% of photography, as it lets you focus on composition while having control over the depth of field, which significantly impacts the image.
Shutter Priority: You control the shutter speed, and the camera does the rest. This is ideal when you want to get creative with slow shutter speeds or freeze motion.
Manual: You have full control over every aspect of the exposure. This mode is great if you want to learn more about exposure or slow down your photography process.
Program: The camera controls all aspects of exposure. Personally, I dislike this mode as it feels like I have no control over the image.
Exposure Compensation
When shooting in any mode other than manual, you can use exposure compensation to adjust the overall exposure baseline. Here’s what I typically do:
Sunny day: Keep it around 0
Overcast day: Overexpose by around +0.6
Night: Underexpose by about -1

Photometry
When shooting in any mode other than manual, you can use the photometry settings to tell the camera how to expose:
Multi: Exposes for the entire scene in a balanced way—ideal for everyday use.
Centre: Exposes primarily for what’s in the centre—perfect for shooting through windows or car windshields.
Spot: Exposes only for the area under the single focus point—great for creative exposure.


Spot Metering

Centre Weighted

Multi Metering
Auto ISO
When shooting in any mode other than manual, you can use Auto ISO to set the minimum and maximum ISO values, as well as a minimum shutter speed. I suggest using a minimum shutter speed of 1/200, a minimum ISO of 160 (or whatever your camera’s lowest ISO is), and a maximum ISO of 6400.

Focus Modes
There are three focus types, with two additional focus modes that you’ll use:
AF-S: Single Autofocus—when you half-press the shutter, the camera acquires focus once. If you or your subject moves, you’ll be out of focus again. This is ideal for landscapes, cityscapes, still life, portraits (without movement), and architecture.
AF-C: Continuous Autofocus—when you half-press the shutter, the camera keeps whatever is in the focus box in focus by continuously refocusing. This is great for any situation where you or your subject are moving, such as street photography.
Manual: Full manual focus—ideal for more control, especially when shooting tricky scenes like fog or reflections.

When using AF-S or AF-C, you’ll have a choice of focus modes, but only two really matter:
Single point: This is a small box that represents one focus point. You can adjust its size, but I suggest keeping it small. This is the most accurate focusing method but may not be the fastest and can risk focusing on the wrong subject if there’s too much movement. I use it for still life, architecture, portraits, and landscapes. It pairs well with AF-S.
Zone: This is a collection of focus points. The camera will focus on anything within the zone, but it decides which specific point to use. This results in quicker focus but with a slightly higher chance of focusing on the wrong subject within the zone. I use this for street photography or anytime there’s significant movement.
Single point gives 100% accuracy but with a higher chance of missing entirely. Zone gives 80% accuracy, but you’re more likely to consistently hit that 80%.