How To Grade Fujifilm F-Log2 in Final Cut Pro (No Plug-Ins)
For the past 5 years, I’ve been shooting most of my videos using the F-Log2 profile on the FujiFilm system. One question that has crept up from time to time is how do I grade the footage and what colour workflow do I use? As the title suggests, this will be done in Final Cut Pro because it’s my main video editing platform. While there are more advanced alternatives such as DaVinci, I find Final Cut to be sufficient for my use case, which is YouTube and short-form videos for social media. This isn’t the correct, the best, nor the most efficient way; this is what has worked for me and delivered the results I wanted. All the editing can be done using the built-in tools you get in Final Cut. You won’t require any additional plug-ins.

Before Editing
While this may seem like common sense now, when I first started making videos, I didn’t quite appreciate how much you need to get right in camera. Even the highest quality video footage can easily fall apart if you get it wrong in camera and then try to fix it later. The first step is to make sure white balance is correct. You can leave the camera on auto, which in most cases will do the job; however, in some scenarios such as during sunset, the camera will shift the white balance mid-filming, which will ruin your footage. In those scenarios, I either lock the white balance using the AWL feature or, better yet, stick it in one pre-determined preset.
The second task is to ensure correct exposure during filming. From personal experience, I found anywhere between 0 and +1 exposure compensation gives great results. Underexposing has resulted in muddy footage unless I specifically wanted to crush the blacks and not recover them in the edit. I have pushed the footage to +1.6 exposure, but I found any more starts to result in highlight clipping.
Editing Layers
In the Inspector Panel on the right, you will find all the edits that you’ve applied to the clip. Each clip has its own edits, and while you can create adjustment layers that impact multiple clips, I will save that for another blog. For now, we will work with a single clip. Contrary to popular belief, the order in which you organise the edits MATTERS, especially if you have a LUT applied. Most adjustments will behave differently depending on if they sit under or above a LUT layer. This might seem confusing now, but as I go through my layer stack, it will make sense. The layer stack I will share now is what I apply on every single clip as a starting point, and then I will make adjustments as needed. You can copy this layout and then save it as an Effect Preset to save time later. You will need to rename the layer to help with organisation. You can rename them to what I have or use your own naming system. The original name will be in brackets. One more thing, just because a layer is there, doesn’t mean it must be used. In many cases, I might remove one or two that are not required for the specific edit I’m doing.

Order of Editing
The first thing I always do is apply the correction LUT. Anything you do before this might need to be re-done. The second step is to set the exposure and white balance using the first two adjustments. There is no point making finer adjustments if the white balance is out or the image is underexposed. After that, I will apply the style LUT if needed and make final adjustments to complete the edit.

Base Adjustments (Colour Adjustments)
This is where the bulk of exposure adjustments will be made. To judge how far to adjust the exposure, I use a tool called ‘Luma Waveform’ that is available in Final Cut.

The first step is to adjust the exposure so that the highlights are sitting between 75 and 100. I would then use the highlights tool to recover them slightly if detail is lost.

I’d then use the brightness, contrast, black point, and shadow slider to balance the rest of the image out. While this tool has other adjustments, I don’t touch them here.

White Balance (Colour Wheels)
The next adjustment is the colour wheels, which I have renamed to white balance. This is the primary way I fix any white balance issues or add a creative shift. I use this tool because it gives me so many options. You can make global adjustments as well as targeting different tonal ranges while having complete colour freedom.

You can use an RGB Parade waveform to fix white balance issues by ensuring all three channels are identical.

Finally, I also use this tool to make any saturation adjustments for the same reasons. A common adjustment is a slight boost in midtone saturation, as this gives a subtle boost without being overpowering.

Fade Curve (Colour Curves)
This is a very simple S-Curve with faded whites and blacks. I find it takes the digital edge off and masks any clipped areas.

HSL Warm (Hue / Saturation Curves)
I use this if I need to make adjustments to the hue, saturation, and luminance of warmer colours such as reds, yellows, and oranges. I don’t use this in every edit, only when I feel it’s required.

HSL Cool (Hue / Saturation Curves)
I use this if I need to make adjustments to the hue, saturation, and luminance of cooler colours such as greens, blues, and purples. I don’t use this in every edit, only when I feel it’s required.

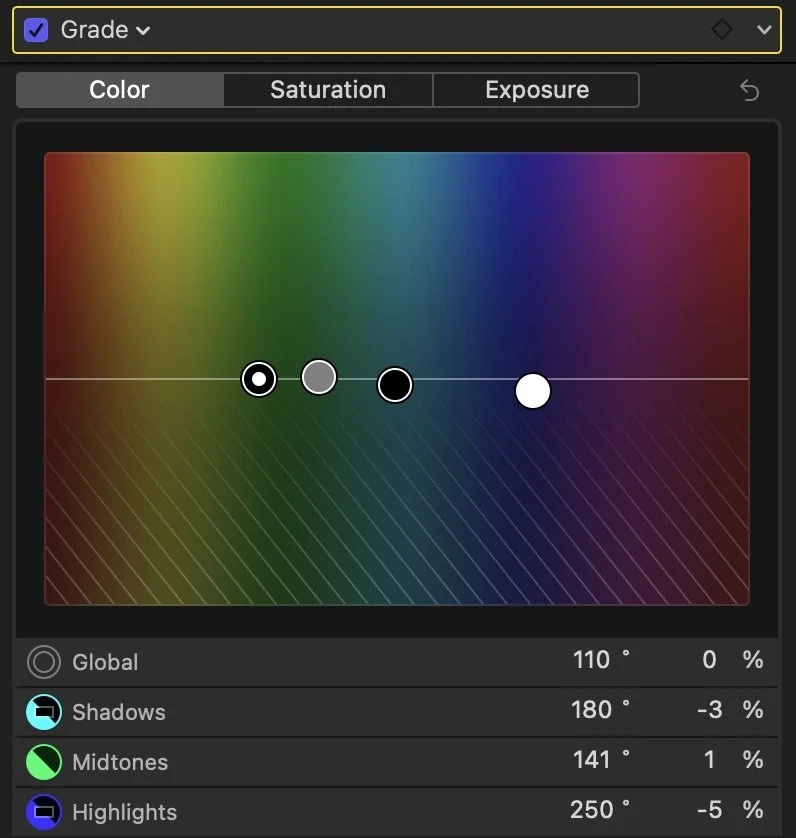
Grade (Colour Board)
This is the adjustment I use to add colours to the highlights, midtones, and shadows. I don’t do it on all videos, but from time to time, a clip can look so much better with a small grade. Typically, I will use either reds or blues in the shadows, greens in midtones, and either oranges or teals in the highlights. There is no exact science here, and I just go by what looks good.
Correction LUT (LUT)
This is a correction LUT to get the footage into a more suitable starting point for editing. You’d think that this LUT should be the first item in the stack; however, to get the most out of your footage, it should go after the bulk of adjustments. While I don’t understand the exact technicalities of why this works, I do understand that I get a lot more dynamic range out of the file. Furthermore, I can push the image a lot more before I see any degradation. For this, I use the F-Log2 to WDR LUT that you can get from Fujifilm’s website. This LUT will give you the best starting point for your footage while maintaining as much dynamic range as possible. There are other LUTs in that pack, so try them and see what works for you.

Style LUT (LUT)
This is another LUT adjustment; however, instead of a correction LUT, I will use a style LUT to give the image a specific look. At this moment, I don’t have my own LUTs and instead purchase random ones I see online and experiment until I find what works. I tend to only apply the LUT partially by reducing the opacity to around 25% strength. This gives a nice hint of the style without being overpowering. This stage isn’t needed at all, and if you want a more natural-looking image, you can skip it entirely.

Final Adjustment (Colour Adjustments)
You can use this layer for any final tuning of the overall image. Furthermore, because this adjustment is placed after the LUTs, how it impacts the overall image is very different. For example, if you want darker blacks, you can achieve that using this adjustment. Think of this as having another set of tools that impact the same adjustments as the base adjustment, but in a slightly different way, thus giving you finer control over the final image. I often use these adjustments to darken the blacks if the image looks a little too faded.

Soft Image (Gaussian)
The final layer is a very fine Gaussian Blur adjustment. It’s set to 1.0, which is barely noticeable unless you really pay attention. What I found is that this can remove some of the digital sharpness you get from modern cameras. I understand this isn’t for everyone, and in some cases, such as on foggy days, I remove this adjustment.

Other Adjustments
There are other adjustments I will add if I need to. Sometimes I would need some noise reduction or grain. I have not included these adjustments in the preset because I don’t use them that much.